


Facebook is a feature-heavy app. If you aren’t customizing your experience on the social network even a little bit, you’re definitely missing out.
If you’re looking for more privacy or you just want your Facebook interface to switch to superhero mode, there are tricks for it all.
Here are 13 good Facebook tricks that you can use right now to upgrade your Facebook experience.
1. Remove Your Last Name from Your Facebook Profile
Let’s start with the most involved trick.
If you want a bit more privacy on Facebook (i.e., keep random people from looking you up and creeping on your profile!), this trick could help.
Technically, Facebook requires every user to submit their first and last name when initially creating an account for security reasons.
Once your account is created, though, you can bypass this so only your first name displays on your profile and across Facebook.

First, you’ll need to change your proxy settings. (Note: These instructions are for Google Chrome. To learn to do this in other browsers, check out this guide from Digital Citizen.)
Click the ellipsis icon in the upper-right corner of your browser. It has three vertical dots, and when you mouse over it, it says Customize and control Google Chrome.

Go to Settings. Scroll all the way to the bottom and click Advanced. Continue scrolling to System > Open proxy settings.

If you’re on Windows, an Internet Properties box should pop up. Go to the Connections tab and click on LAN settings.
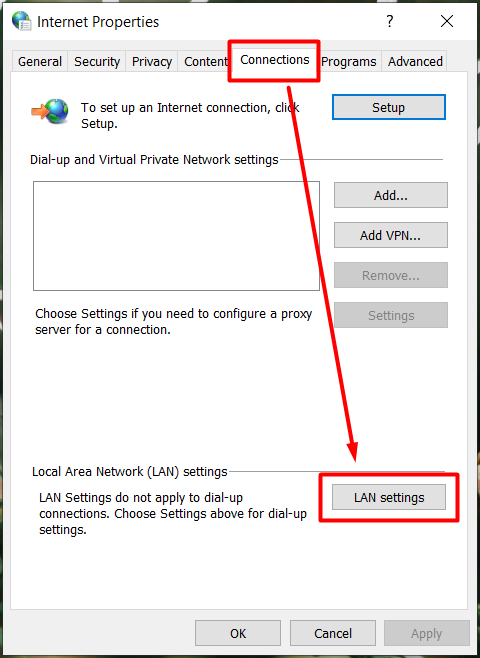
A Local Area Network (LAN) Settings box should pop up. Under Proxy Server, check the box for the option Use a proxy server for your LAN.
Enter 36.65.151.31 for the Address and 8080 for the Port (or use any Indonesian proxy settings) and hit OK.

Once your proxy settings are updated, you can go into Facebook to finish up.
- On the mobile version of Facebook, Go to Settings >> Language Settings.
- Under Language for buttons, titles and other text from Facebook on this device choose Bahasa Indonesian and save.
- Wait for Chrome to automatically translate the page back to English. (Or right-click the page and choose Translate to English.)
- Go to Settings >> Personal information >> Name. Delete your last name and confirm the changes.
- Return to the language settings and switch back to English.
- Voila!
2. Change Your Display Language to ‘Pirate’
While we’re talking about language settings, did you know Facebook has a “Pirate” option?

Note that there’s also an “Upside down” option if you’re feeling extra whimsical.
To make Facebook display in Pirate-speak:
- Go to Settings >> Language.
- Under the Facebook language setting, choose English (Pirate) from the drop-down menu and save.
You’ll see a few major differences immediately.

3. Mute Friends in Your Feed Who Post Too Much
So, you have one of those friends who seems to post whenever the mood strikes. All. The. Time.
You don’t want to unfriend this person, but you want to see less of their *Random Thoughts* and memes on your feed.
In the upper-right corner of one of the offender’s recent posts, click the ellipsis. This gives you options that will help curate your News Feed.

- To mute your friend’s posts (i.e., remove them from your feed without unfriending), choose Hide all from xx.
- If you just want a break from their posts, choose Snooze xx for 30 days.
- To see fewer posts of this nature in general, choose Hide post and make Facebook’s algorithm smarter.
4. Make Your Posts Fancier
A quick way to make your Facebook posts a little more fancy-pants is to use the Cool Fancy Text Generator. Use it to write titles, short blurbs, or make words stand out.
Type your text into the box, choose your style, then copy and paste into Facebook. You can even add fun symbols to spruce things up.
 |
5. Visit Your Facebook Townhall
If you would like to get more involved with local politics, visit your Facebook Townhall to find and follow your local government services and representatives.
You can also quickly contact them to get in touch about an issue.

6. Turn Off Birthday Notifications
By default, Facebook notifies you in the morning when it’s one of your friends’ birthdays. Of course, if you have a big list of friends, this can get annoying.
o turn it off:
- Go to Settings >> Notifications.
- In the list of settings, find Birthdays and turn it off.

7. Download a Copy of All Your Facebook Data
Yes, all of it.
- Posts and photos you’ve created or shared.
- Comments you’ve posted.
- Messages you’ve sent and received.
- Everything you have ever liked or reacted to.
- Your list of followers and who you’re following.
- Even Pokes you’ve given and received (does anybody do those anymore?) are all stored on Facebook.
- If you want a copy of the information from one, a few, or all of these categories, it’s simple:
- Go to Settings >> Your Facebook Information >> Download Your Information.

- Click the checkboxes next to the information categories you’d like to include in your file. Or, filter by date range.
- Choose your format (HTML or JSON) and media quality, then hit Create File.

8. Block App Invites & Game Requests
Say your aunt won’t stop inviting you to play Bubble Shooter. If you can’t take it anymore, block those app invites from ever reaching you – she’ll be none the wiser.
- Go to Settings >> Blocking. Scroll to Block app invites.
- Enter the name of the friend or relative who has an “invite” trigger finger.

9. Download Entire Facebook Photo Albums from People You Follow
The only way to save the photo album from that conference you attended is to download each individual picture one-by-one.
Instead of wasting time, use a Chrome extension to download entire albums at once from people you’re following.
Install DownAlbum for Chrome.
Go to the Facebook photo album you want to download.
Click the DownAlbum icon in your browser toolbar, then click “Normal”.
A new page will load with the photo album. Hit the keyboard shortcut Ctrl + S to save them all at once.

10. Disable ‘Seen’ Timestamps on Facebook Messages
You know those little timestamps that show up under messages when somebody has seen them?

To give yourself more time to reply without looking rude or causing this kind of social anguish, disable the feature on your end.
- Download the Unseen for Facebook Chrome extension.
- Once it’s installed, click the icon in your browser toolbar to make sure it’s turned on.

11. Mute Group Conversations That Are Blowing Up Your Notifications
Let’s say one of your group conversations is getting lively, but you’re at an event and can’t participate/respond. The constant notifications can get annoying/rude/interruptive really quickly.
Don’t just let the flood of messages drown your inbox. Mute them, then go back to the chat later to catch up.
To do it:
- In the offending message thread, hit the gear icon in the upper right-hand corner.
- Choose Mute conversation to stop getting notifications about it.

12. Switch Your News Feed Back to the ‘Most Recent’ View
The dreaded algorithms have changed the way we take in our social media feeds. However, on Facebook, you can go back to the good ol’ “most recent” lineup – where posts display in chronological order without any regard for their popularity or supposed relevance.
- On a desktop, go to the left sidebar to News Feed.
- Click the horizontal ellipsis (the three dots).
- Click Most Recent.

13. Save Links to Read Later
A common scenario: You’re scrolling through your feed quickly before the work day begins. You see two or three links some of your peers shared that look like really good reads, but you don’t have time right now.
The answer? Save them to read later!
- Click the ellipsis icon in the top right corner of the post/link you want to save.
- Click Save link.

To access your saved items on desktop, go to the left-hand sidebar and find Saved under Explore. Or just navigate to https://facebook.com/saved.

Once you start saving a bunch of content, you might want to organize it. Luckily, Facebook now has a handy feature where you can sort your saved items into collections.
This is a great place to save and organize all those interesting marketing articles you see on your feed!